 Add to favorites
I use this mostly for WordPress & Laravel.
Primarily this is useful for any PHP projects.
Step 1 :
You need to enable vhosts.
Open C:\xampp\apache\conf\httpd.conf
Find the line inside there that looks like this :
# Virtual hosts
# Include conf/extra/httpd-vhosts.conf
And remove the # from the include statement.
# Virtual hosts
include conf/extra/httpd-vhosts.conf
—
<VirtualHost *:80>
ServerName leantime.localhost
DocumentRoot “/Applications/XAMPP/xamppfiles/htdocs/leantime/public”
<Directory “/Applications/XAMPP/xamppfiles/htdocs/leantime/public”>
Options Indexes FollowSymLinks
AllowOverride All
Require all granted
</Directory>
ErrorLog “logs/leantime.localhost-error_log”
CustomLog “logs/leantime.localhost-access_log” common
</VirtualHost>

Step 2 :
Enable any php extensions you want to use.
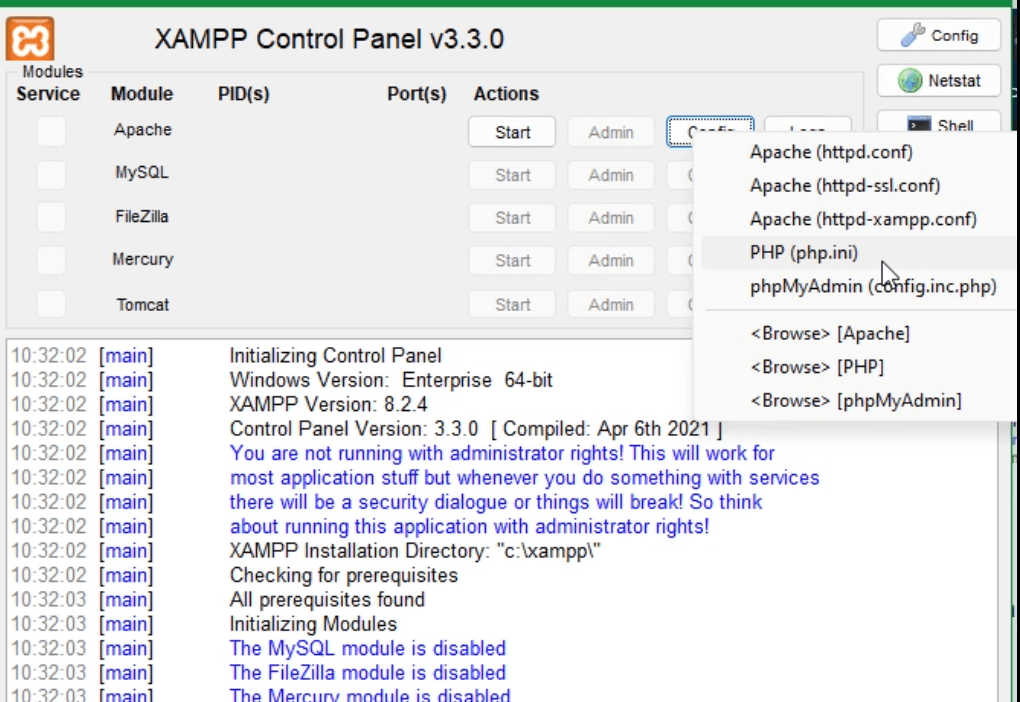
In the xampp control panel. If you select config on the apache line. Select PHP (php.ini)
This is where you enable php extensions you may need.
Same as before. If you want to enable any extensions.
Remove the # at the beginning of the line.

Step 3 :
You need to configure the httpd-vhosts.conf and hosts
Vhosts
Then you need to update https-vhosts.conf with your project directory.
The file can be found at :
C:\xampp\apache\conf\extra\https-vhosts.conf
Inside the hosts file for each project you want to add.
# Virtual Hosts
#
# Required modules: mod_log_config

# If you want to maintain multiple domains/hostnames on your
# machine you can setup VirtualHost containers for them. Most configurations
# use only name-based virtual hosts so the server doesn't need to worry about
# IP addresses. This is indicated by the asterisks in the directives below.
#
# Please see the documentation at
# <URL:http://httpd.apache.org/docs/2.4/vhosts/>
# for further details before you try to setup virtual hosts.
#
# You may use the command line option '-S' to verify your virtual host
# configuration.

#
# Use name-based virtual hosting.
#
##NameVirtualHost *:80
#
# VirtualHost example:
# Almost any Apache directive may go into a VirtualHost container.
# The first VirtualHost section is used for all requests that do not
# match a ##ServerName or ##ServerAlias in any <VirtualHost> block.
#
##<VirtualHost *:80>
##ServerAdmin webmaster@dummy-host.example.com
##DocumentRoot "C:/xampp/htdocs/dummy-host.example.com"
##ServerName dummy-host.example.com
##ServerAlias www.dummy-host.example.com
##ErrorLog "logs/dummy-host.example.com-error.log"
##CustomLog "logs/dummy-host.example.com-access.log" common
##</VirtualHost>
<VirtualHost *:80>
DocumentRoot "C:/xampp/htdocs/dashboard"
ServerName localhost
</VirtualHost>
####################################
# Sites
<VirtualHost *:80>
DocumentRoot "C:/xampp/htdocs/digi"
ServerName site-name1.localhost
</VirtualHost>
<VirtualHost *:80>
DocumentRoot "C:/xampp/htdocs/coverweb/public"
ServerName site-name2.localhost
</VirtualHost>
<VirtualHost *:80>
DocumentRoot "C:/xampp/htdocs/coverweb/public"
ServerName site-name3.localhost
</VirtualHost>
hosts file
This is located under :
C:\Windows\System32\drivers\etc
hosts
Open the hosts file with administrative privileges.
Use any text editor of your choice.
# Copyright (c) 1993-2009 Microsoft Corp.
#
# This is a sample HOSTS file used by Microsoft TCP/IP for Windows.
#
# This file contains the mappings of IP addresses to host names. Each
# entry should be kept on an individual line. The IP address should
# be placed in the first column followed by the corresponding host name.
# The IP address and the host name should be separated by at least one
# space.
#
# Additionally, comments (such as these) may be inserted on individual
# lines or following the machine name denoted by a '#' symbol.
#
# For example:
#
# 192.168.0.1 local.website1.com # Comment here
# 192.168.0.1 local.website2.com # Comment here

# localhost name resolution is handled within DNS itself.
127.0.0.1 localhost
::1 localhost
###########################################
# Sites
127.0.0.1 site-name1.localhost
127.0.0.1 site-name2.localhost
127.0.0.1 site-name3.localhost
###########################################
wsl.localhost
###########################################
# Added by Docker Desktop
192.168.0.106 host.docker.internal
192.168.0.106 gateway.docker.internal
# To allow the same kube context to work on the host and the container:
127.0.0.1 kubernetes.docker.internal
# End of section
