
MYSQL Indexing
Meta Box – Post info disappeared in admin
This problem is due to version conflicts with meta_box plugin
--
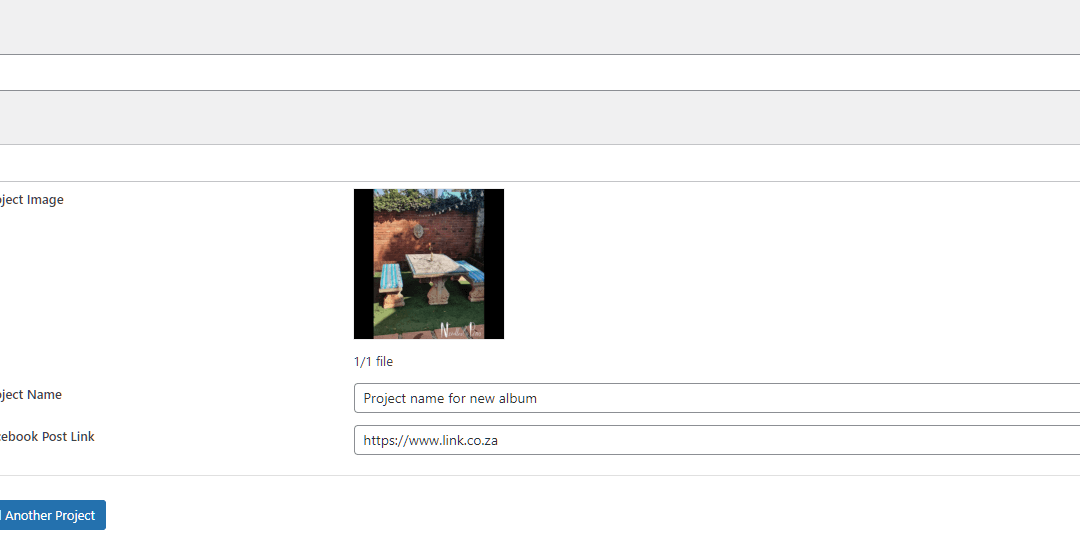
The below is when a new album is been created.
All the post info is visible.
NEW ALBUM

The below is editing an existing album.
All of the post info uploaded is no longer displaying. So my client can no longer edit their posts.
EDIT

New Dev Setup PHP & Ubuntu – For Windows
Useful for Debugging :
https://old.garthbaker.co.za/re-install-ubuntu-windows-11/
Install PHP 8 (Ubuntu Terminal cd ~)
sudo apt update
sudo apt -y upgrade
--
sudo apt update
sudo apt install lsb-release ca-certificates apt-transport-https software-properties-common -y
sudo add-apt-repository ppa:ondrej/php
--
sudo apt update
sudo apt install php8.0
--
php -v
Installing Required Extensions (Ubuntu Terminal cd ~)
The below command should be enough. But if you missing extensions, check below
sudo apt install php8.0-curl php8.0-cli php8.0-xml php8.0-mbstring php8.0-zip php8.0-pdo php8.0-mysql php8.0-gd
If you want to list all PHP 8.0 loaded modules use the command:
php -m
sudo apt install php8.0-

php8.0-amqp       php8.0-common     php8.0-gd         php8.0-ldap       php8.0-odbc       php8.0-readline   php8.0-sqlite3    php8.0-xsl
php8.0-apcu       php8.0-curl       php8.0-gmp        php8.0-mailparse  php8.0-opcache    php8.0-redis      php8.0-sybase     php8.0-yac
php8.0-ast        php8.0-dba        php8.0-igbinary   php8.0-mbstring   php8.0-pgsql      php8.0-rrd        php8.0-tidy       php8.0-yaml
php8.0-bcmath     php8.0-dev        php8.0-imagick    php8.0-memcached  php8.0-phpdbg     php8.0-smbclient  php8.0-uuid       php8.0-zip
php8.0-bz2        php8.0-ds         php8.0-imap       php8.0-msgpack    php8.0-pspell     php8.0-snmp       php8.0-xdebug     php8.0-zmq
php8.0-cgi        php8.0-enchant    php8.0-interbase  php8.0-mysql      php8.0-psr        php8.0-soap       php8.0-xhprof
php8.0-cli        php8.0-fpm        php8.0-intl       php8.0-oauth      php8.0-raphf      php8.0-solr       php8.0-xml
Install Composer (Ubuntu Terminal cd ~)
//Update your packages:
sudo apt-get update

//Install Curl to get the composer library:
sudo apt-get install curl

//Installing composer:
sudo curl -s https://getcomposer.org/installer | php

//Move the composer file to bin path :
sudo mv composer.phar /usr/local/bin/composer

//Verify composer installation :
composer
Install NPM (Ubuntu Terminal cd ~)
sudo apt install npm
Activate WSL 2 and Virtual Machine Platform
(Run as Admin in powershell ~)
NB!!! Don't forget to install the kernel for wsl2 :
https://docs.microsoft.com/en-za/windows/wsl/install-manual#step-4---download-the-linux-kernel-update-package
//Enable the WSL2 without reboot
dism.exe /online /enable-feature /featurename:Microsoft-Windows-Subsystem-Linux /all /norestart

//Enable the Virtual Machine Platform
dism.exe /online /enable-feature /featurename:VirtualMachinePlatform /all /norestart
Set WSL2 Default (Run as Admin in powershell ~)
wsl --set-default-version 2
Re-install Ubuntu Windows 11
// Run the below in your powershell terminal to see installed Apps with WSL //
wsl --list --all

// If you want to remove any packages. Examples: //
wslconfig /unregister Ubuntu
or
wslconfig /unregister Ubuntu-18.04
or
wslconfig /unregister Ubuntu-20.04
Flutter Publish App and keystore
DB Designer – Quick DBD
AWS Code Deploy for Load Balancer with EC2’s
https://www.linkedin.com/pulse/deploy-code-scale-aws-ec2-autoscaling-load-balancer-codedeploy-das/
Manually Started – JS Cronjob
When you write your script and save it, it will not automatically run.
You must load the file first.
After loading the file the cronjob will continue running automatically.
<script type="text/javascript">
  // Cron Timer (Set run timer)
  setTimeout(function() {
   location.reload();
 }, 25000 /* 25 seconds */ );
</script>

<?php
  // Call to Method
  csv_dump_and_send();
?>
Flutter Image Upload
Flutlab – Tabs
import 'package:flutter/material.dart';

void main() => runApp(MyApp());

class MyApp extends StatelessWidget {
  // This widget is the root of your application.
  @override
  Widget build(BuildContext context) {
    return MaterialApp(
      // Application name
      title: 'Flutter Hello World',
      // Application theme data, you can set the colors for the application as
      // you want
      theme: ThemeData(
        primarySwatch: Colors.blue,
      ),
      // A widget which will be started on application startup
      home: MyHomePage(title: 'Flutter Demo Home Page'),
    );
  }
}

class MyHomePage extends StatelessWidget {
  final String title;

  const MyHomePage({@required this.title});

  @override
  Widget build(BuildContext context) {
    return Scaffold(
      appBar: AppBar(
        // The title text which will be shown on the action bar
        title: Text(title),
      ),
      body: Center(
        child: Container(
          child: DefaultTabController(
            length: 2,
            initialIndex: 0,
            child: Column(
              children: [
                TabBar(
                  labelColor: Colors.blue,
                  tabs: [
                    Tab(
                      text: 'OEM',
                    ),
                    Tab(
                      text: 'Hotshots',
                    )
                  ],
                ),
                Expanded(
                  child: TabBarView(
                    children: [
                      Column(children: [
                        Column(
                          children: <Widget>[
                            const ExpansionTile(
                              title: Text('Samsung (357)'),
                              children: <Widget>[
                                ListTile(
                                  title: Text('This is tile number 1'),
                                ),
                              ],
                            ),
                            const ExpansionTile(
                              title: Text('Huawei (4)'),
                              children: <Widget>[
                                ListTile(
                                  title: Text('Huawei P Smart 2021 NFC'),
                                ),
                                ListTile(
                                  title: Text('Huawei P40 lite 6/128GB Black'),
                                ),
                                ListTile(
                                  title: Text('MatePad T10 LTE 32GB Blue'),
                                ),
                                ListTile(
                                  title: Text('P40 lite 6/128GB Sakura Pink'),
                                ),
                              ],
                            ),
                            const ExpansionTile(
                              title: Text('Apple (21)'),
                              children: <Widget>[
                                ListTile(
                                  title: Text('This is tile number 1'),
                                ),
                              ],
                            ),
                            const ExpansionTile(
                              title: Text('Xiaomi (785)'),
                              children: <Widget>[
                                ListTile(
                                  title: Text('This is tile number 1'),
                                ),
                              ],
                            ),
                            const ExpansionTile(
                              title: Text('Oppo (138)'),
                              children: <Widget>[
                                ListTile(
                                  title: Text('This is tile number 1'),
                                ),
                              ],
                            ),
                          ],
                        ),
                      ]),
                      Center(
                        child: Text('Hotshots'),
                      ),
                    ],
                  ),
                ),
              ],
            ),
          ),
        ),
      ),
    );
  }
}
Flutlab – Datatable
import 'package:flutter/material.dart';

void main() => runApp(MyApp());

class MyApp extends StatelessWidget {
  // This widget is the root of your application.
  @override
  Widget build(BuildContext context) {
    return MaterialApp(
      // Application name
      title: 'Flutter Hello World',
      // Application theme data, you can set the colors for the application as
      // you want
      theme: ThemeData(
        primarySwatch: Colors.blue,
      ),
      // A widget which will be started on application startup
      home: MyHomePage(title: 'Flutter Demo Home Page'),
    );
  }
}

class MyHomePage extends StatelessWidget {
  final String title;

  const MyHomePage({@required this.title});

  @override
  Widget build(BuildContext context) {
    return Scaffold(
      appBar: AppBar(
        // The title text which will be shown on the action bar
        title: Text(title),
      ),
      body: Container(
        child: DataTable(
          columns: [
            DataColumn(label: Text('ID'), tooltip: 'Book identifier'),
            DataColumn(label: Text('Book')),
            DataColumn(label: Text('Author'))
          ],
          rows: [
            DataRow(cells: [
              DataCell(Text('#100')),
              DataCell(
                Text(
                  'Flutter Basics',
                  style: TextStyle(fontWeight: FontWeight.bold),
                ),
              ),
              DataCell(Text('David John')),
            ]),
            DataRow(cells: [
              DataCell(Text('#101')),
              DataCell(Text('Dart Internals')),
              DataCell(Text('Alex Wick')),
            ])
          ],
          showBottomBorder: true,
          headingTextStyle: TextStyle(fontWeight: FontWeight.bold, color: Colors.grey),
        ),
      ),
    );
  }
}